 Convert any tweet to static image
 Send email to anyone anonymously
 Check Alexa Rank for sites
How to create your own Proxy Server
Typically when you want to hide your connection behind a proxy server, you would either use one of the publicly available servers, or you would pay to rent your own private proxies available from hundreds of providers operating out there.

But how would you go about creating and hosting your own proxy server?
The software we want to use here is called Squid, which is one of the more popular applications for such purpose today, and has been in active development since 1997! It works on both Linux and Windows, but this guide will focus exclusively on how to make it work on Linux platforms.
Next, we will need a server because it makes little sense to host this on our own personal computer. The kind of server we are looking for should have a fast hard drive (SSD is a must). CPU and memory is not as important. 1 GB ram is plenty. That server should also have a fast connection, and ideally - unmetered bandwidth. GoDaddy and OVHcloud are examples of VPS services that truly provide UNLIMITED bandwidth at very cheap prices. Otherwise, just go with Amazon or Linode.
Installing Squid using one-liner script (recommended)
For maximum convenience and compatibility across various Linux platforms, we provide you with a single bash script that automatically installs and configures everything for you with one command. You may also use the form below to further customize exact settings of the Squid server that will be installed on your server such as the port it runs on, etc.
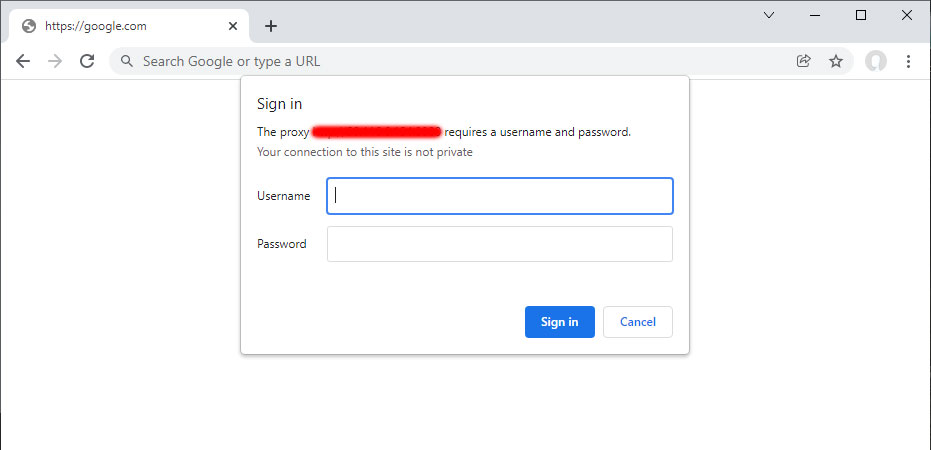
Note: There are bots that constantly scan the Internet looking for open proxy servers to be used. To protect your Squid server from abuse, or to avoid being discovered in the first place, you need to either host your proxy on some rarely used port, or make it require a username and password.
between 1025 and 65,535
Use the command below to automatically install and configure Squid on your new server:
bash <(curl -s "https://www.proxynova.com/scripts/install_squid")
✓ Successfully tested on Ubuntu, Debian, and CentOS
Verify that your new proxy server is able to correctly forward requests:
curl --proxy "admin:password@localhost:8080" azenv.net
Same as above, but detect exact port used by squid:
curl --proxy "localhost:$(cat /etc/squid/squid.conf | grep -i http_port | awk '{print $2}')" azenv.net
From outside:
curl --proxy "admin:password@$(curl -s checkip.amazonaws.com):8080" azenv.net
Installing Squid Manually
The instructions below are very much Ubuntu-specific, although they will be similar on
other systems.
Recommended way of installing Squid is by using the express installer above since it is compatible across
multiple
Linux distros.
Login to your existing Linux-based server or spin up a new one and let's begin.
First step is to make sure you are always working with the latest software packages available:
sudo apt-get update
Now we are ready to install Squid:
sudo apt-get -y install squid
This will install and automatically start the server that accepts connections on port 3128.
However, by default, you will get an Access Denied error message when trying to visit any website:

We will need to edit Squid's configuration file that is located here:
/etc/squid/squid.conf
The default squid.conf file that you get when you first install Squid, is
over
8000 lines long, because all the documentation
is included as comments in that file. This makes finding and editing individual options very inconvenient.
So given that the default configuration file is mostly comments anyway,
it is usually best to start completely from scratch with an empty file.
Clear the contents of squid.conf file using:
echo "" > /etc/squid/squid.conf
Good news is that Squid needs very little configuration to make it work - basically it only wants to know what port it should run on, and who should have access to it.
Edit squid.conf using Vim:
vim /etc/squid/squid.conf
The following options will configure Squid to run on port 8080, and make it accessible to anyone:
acl all src all

## makes our proxy anonymous too
forwarded_for delete
request_header_access From deny all
via off

http_port 8080
http_access allow all
Save changes, and notify Squid of our new configuration using this command:
squid -k reconfigure
Your Squid server should now allow all requests to go through!
If you are happy with your proxy server being open to anyone on the Internet, then there is nothing left for you to do.
Otherwise, you may choose to just host it on some obscure port that bots almost never scan like 61,234. That way even though your proxy remains "open", only you will know which port it accepts connection from. Obviously this is "security through obscurity" at best, and so it is not bulletproof. For proper username/password authentication follow steps below.
Authentication with Squid
We will need htpasswd program for generating our passwords. Get it by installing this package:
sudo apt -y install apache2-utils
Use this command to generate a file containing your chosen username/password:
sudo htpasswd -cb /etc/squid/passwords some_username some_password
That should have created a new file at /etc/squid/passwords. Now we just need to tell Squid to use
that file during authentication.
We need to edit our squid.conf file again.
Remove the line with http_access allow all, and add this at the end instead:
auth_param basic program /usr/lib/squid/basic_ncsa_auth /etc/squid/passwords
auth_param basic children 5

acl authenticated proxy_auth REQUIRED
http_access allow authenticated
Reload Squid configuration again, and try connecting to your server now:
squid -k reconfigure
Amazing
There are so many other cool things you can make Squid do, but this is it for now. I'll write up more about this later.
Monitoring Squid Traffic
Very useful utility app that you should install is squidclient along with vnstat:
sudo apt-get -y install squidclient vnstat
You can then see a bunch of details by this command:
squidclient -p mgr:info
More tips & tricks coming soon...
Miscellaneous
A proxy server that receives a lot of traffic, may encounter this warning: WARNING! Your cache is running out of filedescriptors
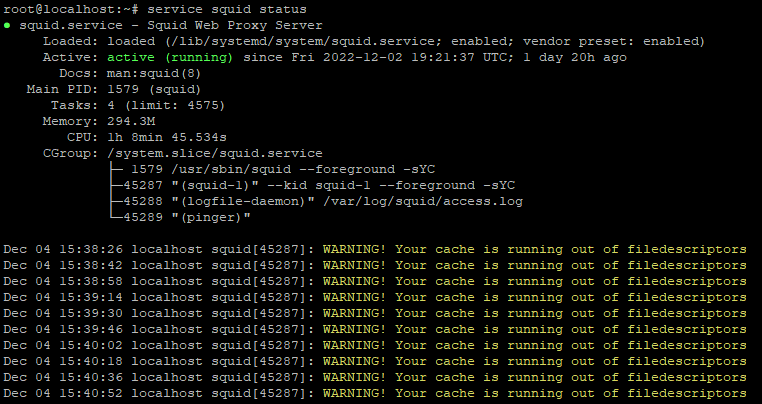
To fix this, you need to increase the limit of open file descriptors on your system using this command:
ulimit -n 65535
And then edit /etc/squid/squid.conf file, and add/edit this configuration directive:
max_filedescriptors 65535
You must restart Squid afterwards, and then you are good to go!
service squid restart
Periodically restart Squid server if it crashes
Squid proxy will sometimes crash if it receives too many connections at once, or for other reasons. Therefore, it makes sense to setup a cron task that periodically checks the status of the Squid service, and restarts it if needed. The cron expression below will do just that (every minute):
* * * * * systemctl is-active --quiet squid || systemctl restart squid
If the Squid proxy service is active, the first statement will return an exit code of 0, which represents successful or true value, thus ensuring that the second statement will be ignored or skipped. The second statement will only execute if the exit code from the first statement is anything other than zero, which happens only when the Squid service is not active.